clarky003
Tank
- Joined
- Nov 8, 2003
- Messages
- 6,116
- Reaction score
- 1
Follow along with the video below to see how to install our site as a web app on your home screen.

Note: this_feature_currently_requires_accessing_site_using_safari
") . ~pats fenric on the back~. atleast maybe in respectability terms,I can prove im not a faker . lol. that sounds a bit camp but,, meh
. ~pats fenric on the back~. atleast maybe in respectability terms,I can prove im not a faker . lol. that sounds a bit camp but,, mehcrabcakes66 said:That is one ugly sperm.....
He was trying to make a joke.Rupertvdb said:Why would you say that? ;(
Fenric said:Since people don't seem to realise, and Clarky hasn't exactly made it clear
He's modeling this http://www.halflife2.net/forums/showthread.php?t=20372&page=2 to prove he can, after admitting he's been a bit of a naughty boy recently with regards certain model files
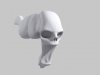
?... displacement map...? the rings/discs are more a grill pattern, it doesn't have fangs, and its lips should be more defined/humanish. There's still a lot that needs modeling, Though you are (correctly) planning to use displacement maps. So I'll wait and see how much you intend to do with those. The area inside the nose wants to be more delicate, probably broken even. The "eyes" aren't too bad, but seem too evil for want of a better word. They want to be changed slightly to give a more hopeless/sad/generic appearance to them. Also the area's below the eyes should sag a little, changing it from what would appear to be a semi-normal skull to something that looks almost melted and distorted.clarky003 said:how should the rings be,, ..? the smoothness will be disrupted by a map i was hoping, a displacement bump map
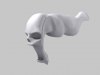
very nearly finished with the mesh, I think,, but this is where the input helps,, anything need to be tweaked?
I would definately convert from a subd polygon object to NURBS though. Because of how NURBS work you can go crazy with the displacement mapping details. Like the CG Godzilla or Jurrassic park dinosaurs and countless other movie creatures, far less error prone than subd displacement IMPO.
. So you use NURBS. Their not polygons and they don't suffer the same errors. You can get far far far greater detail with displacement mapping using NURBS surfaces than you can subdivided polygons. Also polygons don't like being stretched, unavoidable with displacement mapping


Fenric said:If your showing subd displacement vs NURBS displacement you should show an example of both for fairness.
I hope he does manage to get it into NURBS, I was always put off by them in the beginning but glad I gave them a chance. I just don't know if MAX can convert subd to NURBS, to be honest I don't even know if XSI can as I use MAYA to convert to NURBS. The beauty of that I find, is you miss out on the complicated parts involved with actually modeling in NURBS, which I agree is a whole other kettle of fish to poly modeling. Yet you get the benefits of the displacement mapping, and of course the benefits when it comes to UV mapping too. So i find it pretty usefulsoftmonkey said:Will do. Tomorrow. Privately. (BTW, that is a default poly sphere)
i agree, the right tool for the right job. NURBS modelling is a whole different ART to poly modeling. I will be interested to see if Clarky manages the conversion.
Anyway, its Clarky's thread, so I'll let him do the rambling.
,,I hope he does manage to get it into NURBS, I was always put off by them in the beginning but glad I gave them a chance. I just don't know if MAX can convert subd to NURBS
clarky003 said:thanks Gooch, im still insulted slightly at the comments fenric posted in the other thread. but soon I will forget
, and its appreciated that you gave it your best shot. And I'd be interest in seeing you try it again when you learn more in MAX, especially displacement mapping which is a cool feature hehe naa just messing