Brazooka
Newbie
- Joined
- Apr 14, 2004
- Messages
- 286
- Reaction score
- 0
Follow along with the video below to see how to install our site as a web app on your home screen.

Note: this_feature_currently_requires_accessing_site_using_safari

Triggerhappy41 said:wow gj. Better than i could do at this point. Definitely keep it up
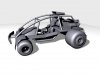
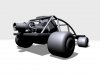
The jet engine is tight.
IchI said:ye its really good for your first model. But I don't think it would run proberly in the HL2 engine because it seems a tad bit to high polgon. If you don't know already then models are converted to triangles when put into games and this will basiclly double any polgon count you currently have If your using 4+ sided polgons.
Stone said:I have one comment, that is that it seems to be very high poly, how many polies is it?
babywax said:Can't tell you if you need to reduce it without knowing the count
First, save your work. Then, make all the objects on your vehicle in to 1, then right click on the big uber object and click convert to editable mesh. Then press 7. Polycount will be displayed in the active window.
Make sure you use editable mesh, editable poly won't give an accurate count.
EDIT:
BTW, after you have the count you can go back to your recently saved work
Lupus said:The rounder something is, the more polygons it has. Compare a cube to a sphere, 6 polys in a cube, a lot more in a sphere. To reduce that to a low enough poly count for HL2 you might want to reduce the smoothness of the rollcage bars. A cylinder with 8 sides might work ok for that. Look around for other round areas like the tires, there are loads of polygons in them as they are very round and smooth. Might want to use a cylinder with about 15 sides for the outer tire, and for the inner part too. Experiment and watch the poly count. Basically just try to reduce the roundness.
Atleast in HL2 it does. A polygon can be either a triangle or a quadrant. A quad has 4 sides, so if the engine accepts quads then a cube has 6 polygons. HL2 (AFAIK) uses triangles only, so it takes 2 triangles to make a square, 12 to make a cube.babywax said:I've always used the "Attach" function, then welded any vertices that needed to be welded. If you're using nurbs/splines etc... you'll need to convert it to polygons... There's a tutorial for that with max I think.
BTW:
A cube has 12 polygons, 6 sides
Triggerhappy41 said:"tight" means its cool looking or cool in general. slang.
babywax said:If you're still having trouble, make sure both objects are editable meshes.
Then, click on the attach button and click on the second object in the perspective view (my preference, any view will work). Voila! You have just made two objects in to one. It's sort of like grouping them, so that when you want to merge vertices between them you can.