high poly MclarenF1

clarky003

Tank
Joined
Nov 8, 2003
Messages
6,123
Reaction score
1
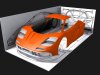
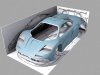
Ive spent a day on this already as its part of a Uni project im working on using the program. I really would like to help modellers getting started :) , or who just want to get to grips with detailed models, so ive thought of posting some mini tutorials with this one at some stage.

the model stands at 25,810 (Mclaren1.jpg) with two sets of smooth control literations added to the render. i can bring it all the way down to 7,840 at the moment with no smoothing. But any sports car finatics out there feel free to crit. or anyone for that matter.

not too sure what ive set myself in for on this one, as im trying to model the interior aswell. And as always all the special effects will be wacked on later ;) .
 

Attachments

  • Mclaren.jpg
    Mclaren.jpg
    52.7 KB · Views: 300
  • Mclaren1.jpg
    Mclaren1.jpg
    32.3 KB · Views: 296
it looks great clarky, but seriously dude, if your gonna be modeling high poly stuff give nurbs a try :) much more manageable.
 
ukfilmer said:
it looks great clarky, but seriously dude, if your gonna be modeling high poly stuff give nurbs a try :) much more manageable.
aha! someone else who likes NURBS.. Hey Munro, can I keep him? :)
 
hehe, i like maya too! :) nurbs are great things, i just have to learn them properly :)
 
I like Nurbs too :), just got to learn how to use them with ease. but I must master this technique first.

as for hosting my stuff Pendragon. thanks for the offer but i will at some stage when i believe i have a comprehensive enough portfolio, get round to hosting it myself.
:D

at the moment im building the doors and starting the interior, working from front to back. 3Ds has great conversion to Jpeg without much loss of quality of high resolution pictures. so i tried 1024 by 768 so you guys can take a better look at the mesh.
 
this has inspired me im going to want to give this ago m8. Cant waite for the tutes
 
That's really cool, clarkomatic. Nothing much else to say.
 
whoa, that looks great. I love McLaren's.
 
ok im doing this mini tute in two parts, in the thread as there are 10 images to go with it.

im focusing on the back wheel arch , this is a stress free tutorial, must have basic knowledge of the editable poly function. heres the back wheel arch (wheelarch.jpg)

we are going to be putting the underside of the wheel arch together, in order to do this accurately a box must be drawn and then aligned roughly to one of the underside edge faces, then convert it to an editable poly and select the top and sides using the face select tool, leaving just the bottom face unselected.
(wheelarch1.jpg)

delete those selected faces,

use the vertex editor tool to align it with the one polygon edge, drag selecting in the front viewport or whichever is set up to give you a head on view.
(wheelarch2.jpg)

select the edge tool and select the edge shown in wheelarch3.jpg we are working down off to the right then repeat the process down to the left.
extrude the edge and set the values shown , click apply
(wheelarch3.jpg)

drag the edge to the end of the next polygon on the arch aligning it fairly accurately. click apply again and repeat down to the bottom of the right side of the arch, note for the last extrude you should click OK, or you will have an extra polygon poking out at the bottom that you dont need. repeat and do the same on the left side of the arch.
(wheelarch4.jpg)
 
now the shape has been made we need to add a bit more depth and attach the new mesh to the origional. so select the back vertex points and ajust for your desired depth
(wheelarch5.jpg)

select the main mesh and find attach , the new mesh for the arch here is named Box07. select whichever you decide to call the new mesh or whatever it is designated at. Now click attach
(wheelarch6.jpg)

using the weld tool, set the value 2.0, shown in wheelarch7.jpg
select the two verts between the two seperate meshes to join them and click apply. go all the way round and weld them all. clicking apply after ech one is selected to finalise the weld.
(wheelarch7.jpg)

Using the face tool, select the inside of the arch as shown. and apply your smoothing group, click auto smooth
(wheelarch8.jpg)

Under subdivision surface click use NURMS and set the literations to 1
making sure both box's under Seperate By are selected. and view the results.
(wheelarch9.jpg)
 
Would it not just be easier to select the edges of the wheel well and extrude them inwards? You can do it in maya and keep the faces together, I'd imagine you can do the same in Max.

PS. The car is looking great :)
 
yeh origionally i would of done that, lol, but im trying to help and show the aspect of using and creating seperate meshes and combining them together, as most of the car body is done in this method,. Plus if id just done that it wouldnt of made much of a tutorial, lol. im sure everyone knows how to just select edges and extrude.
 
started interior of doors. added some general detail,proper covers over lights , this render is mainly a ray trace test.
 
looking very cool, atleast its visible without 500% reflections hiding everything
 
ha... hmm say no more , reflections are cool in realistic amounts, the model is around 30% reflective. :)
 
Back
Top